How to: Easy eye shadow application
MELD’s own make-up queen, Amrit Kaur, shows you how to apply flawless eye shadow that will complement your eye shape in minutes.
Putting on make-up can seem tedious, and even daunting, especially if you can’t tell your foundation from your concealer. But with everything in life, practice makes perfect.
But if you’re not sure where to start on this journey, why not begin with your eyes? They are, after all, one of the most prominent features of our faces.

The tools: Neutral eye shadow palette, eye shadow primer, flat brush, rounded crease brush, eyeliner and mascara. Photo: Amrit Kaur
When applying eye shadow, it’s important to understand the shape of your eyes and know how best to accentuate it. Certain colours will flatter certain eye types, as will certain techniques. By knowing your eye shape, you can better translate the trends to suit your look.
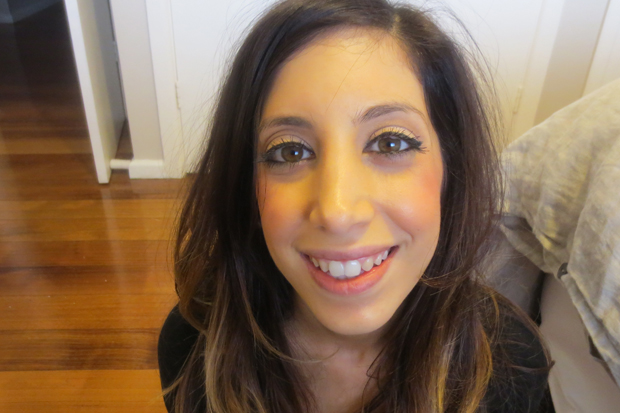
For this tutorial, I’m working with two models with different eye types, Venessa and Helena. Let’s begin with Venessa. Venessa has almond-shaped eyes, so we want to bring out the natural lift and make her eyes look bigger.
| Step 1: Start by priming your eyelids with a primer like Urban Decay Eyeshadow Primer ($20). This helps the eye shadows stay on longer and also prevents the colour from creasing, which is something no self confessed beauty queen wants. |
| Step 2: Using the flat brush, apply a shimmery beige colour across the entire eyelid. |
| Step 3: Follow with a dark satin brown colour applied to the crease with the rounded brush using a windshield wiper motion. With this particular eye type, the dark colour helps give the illusion of deeper eyes. |

Add contrast in a darker shade. Photo: Amrit Kaur
| Step 4: Use the leftover product from the flat brush on your brow bone as a highlight. This helps to accentuate the brow bone. |
| Step 5. Now all you need to do is apply black eyeliner on your upper eyelids and a few coats of mascara. This is optional, but I feel it is necessary to complete the look. |
Now, let’s move on to Helena. Helena has deep set eyes with a strong brow bone and a lot of eye space. We want to highlight that brow bone, but ensure we don’t make her eyes look sunken.
| Step 1: Just as I had done earlier, start by applying eye shadow primer evenly across your eyelids and all the way up to your brow bone. |
| Step 2: Using the same shimmery beige colour, apply it all across your lids, making sure not to go past the crease. |
| Step 3: Using the same brush, apply a gold shadow to the outer two-thirds of your eyelids, just to give it a ‘pop’. |
| Step 4: With the rounded brush, apply a medium brown matte eye shadow into your crease. With deep set eyes, you should avoid being too heavy-handed with the dark colours in the crease, as they can tend to recede the eyes further, making them appear almost ‘sunken’. |
| Step 5: Finish by applying a highlight colour under your eyebrows. |
As shown in the picture above, you can choose to leave it at that. But if you do have the time, I do suggest applying eyeliner and some mascara as I did with Helena. This pulls the look together, making the eyes the stand-out feature.
Take note that the girls are wearing almost no make-up apart from what is on their eyes and they still look incredible! The trick is to keep practising and pretty soon you’ll be confident enough to experiment with bolder colours.
Have fun and good luck!


